Friday, July 29, 2011

Flour --- In a cloth bag!!

Last week I was running low on my all-purpose flour, which actually makes me happy because I LOVE to shop for baking supplies. I ventured out to the grocery trying to convince myself why it is necessary to spend extra on King Arthur (it is sooo much better, that's why). I made it to the flour section of my beloved baking isle and couldn't believe what I was seeing:
Imagine the sound of angels singing a beautiful harmony.
Flour! In a cloth bag!?! "Flour in a cloth bag" I said to myself and then giggled - aloud - in public. I didn't know such a thing was still in production. Well it is true - and I would have bought the whole lot for fear this was some sort of fluke. It was priced right too, $3.99 for the 5lb bag (less than my favorite King Arthur). Needless to say, I was beyond excited. So I will give the cloth bag of flour a try and see how it works out. In the meantime, I would like to thank Cortez Milling for producing such a perfectly packaged product and bringing excitement to my day. Now, if only I could get milk in glass bottles life would be complete...

Thursday, July 28, 2011

Auntie M's Tater Salad

By no stretch of the imagination can this delicious potato salad be considered "healthy". I'd like to think that it can be healthy...but the closest I can get is that it is a healthy portion of nostalgia. I suppose it is only nostalgic to me, so you are on your own in justifying any health benefit. HOWEVER, if you are looking for something tasty you have hit the jackpot.


A big bowl of deliciousness.

 My Aunt Mel has been making this potato salad since I can remember - she makes it better than anyone. It could win a blue ribbon at the state fair if they had such a contest. It reminds me of summer, it reminds me of home, it reminds of when I was 7 and begged her to omit the onions (and because she loved me she would make a smaller bowl, onion free). On occasion, when I am feeling homesick, I get some taters boiling and try my best to replicate Mels recipe.


I would be happy to share this recipe with you if I could but I suppose there isn't really a recipe at all. This potato salad is made by combining ingredients in no measurable amount. It depends on the size and texture of the potatoes...when it looks right, it is done. I can provide an ingredients list should you want to give it a go: Mayo, taters, Mayo, pickles, Mayo, eggs, Mayo, mustard, vinegar and seasonings (salt, pepper, paprika). Did I mention Mayo? I've watched her use a whole jar before. Not kidding.

Happy Eating!

Sunday, July 17, 2011

Coconut Banana Bread with Lime Glaze

Back in 2007 I pulled a recipe out of my Cooking Light magazine for Coconut Banana Bread with Lime Glaze. It looked divine and I was sure I would make it for a summer treat, perhaps to take on a camping trip! Sadly this was not the case - 4 years later and an invitation to a girls day of crafting I pulled the recipe from deep in my memory bank, alas, it was time to give this banana bread recipe a whirl. Thanks to my binder-o-magazine recipes (complete with plastic page protectors) I was able to find the recipe in mint condition (it can also be found on the information super highway here).

I am a banana bread fanatic, always looking for the perfect recipe. I usually bake quick breads in the fall and winter but this recipe called for coconut and lime so I felt it was suited for summer baking. I made two smaller loaves, as opposed to the 9x5 loaf it recommended in the recipe. The banana bread turned out very well, slightly crumbly, crispy coconut on top and a nice hint of lime in the glaze. If you are in the mood for summer baking, give this one a try!

My two smaller loaves, one to keep, one to give away!

Coconut Banana Bread with Lime Glaze

Ingredients
  • 2 cups all-purpose flour (about 9 ounces)
  • 3/4 teaspoon baking soda
  • 1/2 teaspoon salt
  • 1 cup granulated sugar
  • 1/4 cup butter, softened
  • 2 large eggs
  • 1 1/2 cups mashed ripe banana (about 3 bananas)
  • 1/4 cup plain low-fat yogurt
  • 3 tablespoons dark rum
  • 1/2 teaspoon vanilla extract
  • 1/2 cup flaked sweetened coconut
  • Cooking spray
  • 1 tablespoon flaked sweetened coconut
  • 1/2 cup powdered sugar
  • 1 1/2 tablespoons fresh lime or lemon juice

Preparation

Preheat oven to 350°.

Lightly spoon flour into dry measuring cups; level with a knife. Combine flour, baking soda, and salt, stirring with a whisk.

Place granulated sugar and butter in a large bowl; beat with a mixer at medium speed until well blended. Add eggs, 1 at a time, beating well after each addition. Add banana, yogurt, rum, and vanilla; beat until blended. Add flour mixture; beat at low speed just until moist. Stir in 1/2 cup coconut. Spoon batter into a 9 x 5-inch loaf pan coated with cooking spray; sprinkle with 1 tablespoon coconut. Bake at 350° for 1 hour or until a wooden pick inserted in center comes out clean.

Cool in pan 10 minutes on a wire rack; remove from pan. Combine powdered sugar and juice, stirring with a whisk; drizzle over warm bread. Cool completely on wire rack.


The professional photo from Cooking Light


Wednesday, July 6, 2011

Cherry Amaretto Drop Cookies

Several weeks ago I invented a new recipe: Cherry Amaretto Drop Cookies. I can't take full credit for inventing the recipe per-se, rather I simply reconstructed an old recipe for Polka Dot Cookies (PDC) my mom and I make at Christmas. As far as I know, she and I may be the only people that like the PDC's, but nevertheless, we keep making them (and eating them). The PDC recipe calls for red and green maraschino cherries, walnuts and chocolate chips -- pretty fancy. However, with cherry season in full swing I decided to give the PDC recipe a classy little makeover. 

It all started by soaking some beautiful bing cherries in Amaretto <<Drool >>.  The end result was fab! I added chocolate chips to the last dozen for some variety. These tasty cookies have a cake or biscuit texture, they are not overly sweet. I recommend them to anyone looking to make good use of summer sweet cherries!


Cherry Amaretto Drop Cookies

Ingredients:
1 C. Margarine
1/2 C. Sugar
1/2 C. Brown Sugar
2 Eggs slightly beaten
2 tsp. Vanilla
4 C. Flour
1/2 tsp. Baking soda
2 tsp. Baking powder
1/2 tsp. Salt
1/2 C. Milk
1 C. Bing Cherries, halved
1/3 C. Amaretto

Combine cherries and amaretto in bowl, soak overnight. Mix dry ingredients in medium bowl. Mix liquids, except milk, in large bowl. Add dry ingredients to liquids alternating with addition of the milk.

Drain cherries of excess liquid. Fold into cookie dough.


Drop big teaspoons of batter onto greased cookie sheet. Bake for 10-12 minutes at 375 degrees.


ENJOY!

Thursday, June 16, 2011

Sippin' Summer

Well, it's summer. Most people get excited that summer has arrived. Not me. It's hot. It's REALLY hot here in AZ. I don't like summer at all and unfortunately I am too young to be a snow bird.

Here is the thing - I can't drink enough water in the day to quench my thirst.  I don't like soda pop and sadly wine makes me too puffy in this heat. Fortunately, I discovered a delightful little concoction that actually satisfies my need for cold refreshment. This magic thirst quenching delight is none other than a chilled can of La Croix Sparkling Water. I prefer the Cran-Raspberry infused water over ice with a couple of mint leaves and a slice of cucumber. It's delish. I also prefer to drink it out of a wine glass; it's fancier that way.


Sippin' Summer.


Monday, May 30, 2011

Bing! It's Cherry Season!

Yesterday at the grocery store I wandered into the produce section as I would any other day - intending to pick up bananas for my husband.  Naturally, I would end up with some ho-hum citrus for myself.

Then I saw them.

My heart fluttered.

A smile swept across my face and I ran to them completely forgetting about the bananas, husband and citrus. "YES!!!!!" I shouted (in my head). "Alas! It is cherry season!" I LOVE cherries. Love them. 

An index of recipes started racing through my mind - visions of Bon Appetit! summer volumes perfectly illustrating cherries in desserts, salads, and glazes - oh the possibilities!

I left the store with only one bag. I promised myself to ease into it - savor the season. My little AbbyMuffin and I enjoyed them this morning on the patio (she really didn't have any - but she was certainly curious). It was a beautiful morning - birds chirping, hot coffee in my McDreamy/McSteamy mug and perfectly sweet cherries. I love summer.


Some recipes I would enjoy making and tasting:


From Bon Appetit! - Oh my.


One Perfect Bite - I would say so.


An avocado and a cherry? I'm very intrigued.


Oh Martha. You get me every time.


Sunday, May 29, 2011

Roasted Broccoli? Yes, Please!

Well, it is Memorial Day weekend. While my friends and family are out golfing, lounging by the pool, celebrating with tasty libations and having fun - I am home with a never ending cold, roasting broccoli. I'm not looking for sympathy because let me tell you, this broccoli is divine. Not only is this broccoli tasty it is also healthy. Woot! It is officially my first TastyHealthyThing to blog about.

A few months ago, my dearest friend Amie told me about this beautiful site in which I found a recipe for Oven Roasted Broccoli. I've wanted to make it for a while now and I am so happy I finally did. Some sort of wizardry happens in the oven as the broccoli roasts to perfection. The result is perfectly tender, crispy crunchy goodness, a slight carmalized effect from the oil and a zing from the garlic and red pepper flakes. Mmmmmmmm.

A quick and easy recipe that is guaranteed to please the palate!
 
The result as shown at Honey and Jam

  • 1 1/4 pounds broccoli crowns, cut into florets (about 8 cups)
  • 4 1/2 tablespoons olive oil, divided
  • 3 garlic cloves, minced
  • Large pinch of dried crushed red pepper

Chop the broccoli (Not 8 cups worth, I made this recipe for 2)
 
Rinse the broccoli

Preheat oven to 450°F. Toss broccoli and 4 tablespoons oil in large bowl to coat. Sprinkle with salt and pepper. Transfer to baking sheet. Roast 15 minutes. (I was only slightly worried the smoke alarm would go off)

Ready for roasting!
Stir remaining 1/2 tablespoon oil, garlic, and red pepper in small bowl. Drizzle garlic mixture over broccoli; toss to coat. Roast until broccoli is beginning to brown, about 8 minutes longer. Season to taste with salt and pepper. Serve immediately.

Because a man can't survive on broccoli alone, my husband grilled steak.

Enjoy! 

Thursday, May 19, 2011

Brownie Cookies - For Health Reasons...

"Health Food" - the definition can vary depending on the person, latest diet trend or current level of stress.

In this case, I must share with you that my sister is getting married in one month. If that weren't enough to boost a girls' stress level, she has also volunteered to watch my dog Abby for the weekend while my husband and I are away. She's a saint.  Needless to say, her stress level is CODE RED: Needs Chocolate!!! 

This TastyHealthy Brownie Cookie Recipe I stumbled upon at Lifes Ambrosia will be the perfect "Thank you for watching my crazy dog - please try to relax" gesture.They certainly look like ooey gooey tasty delights and the health factor will be determined by the mental relief felt by those who taste them!


Makes 20-30 cookies

Ingredients:
  • 1 package fudge brownie mix
  • 1 1/4 cup all purpose flour
  • 1/4 cup packed brown sugar
  • 2 eggs
  • 1 stick butter, melted, cooled
  • 2-3 tablespoons cold water
  • 1 cup dark chocolate chunks (or Semi-Sweet...or Milk Chocolate...)
Instruction:
  • Whisk together flour, brownie mix and brown sugar.
  • Using a heavy spoon, stir in eggs one at a time. Followed by butter and 2 tablespoons water. If the batter appears like there is too much flour add 1 more tablespoon of water. Batter will be very thick.
  • Fold in chocolate chunks
THICK batter....look at that spoon!

  • Cover and refrigerate for 2 hours.
  • Preheat oven to 350 degrees.
  • Grease a cookie sheet or use parchment if you have it handy.
  • Drop heaping tablespoons of dough on the cookie sheet, you want pretty thick cookies here to get the brownie feel, about 3 inches apart. Press down slightly. Don’t flatten completely.

Tasty little mounds - ready for baking
  • Bake for 8-10 minutes.
  • Remove from oven, allow to cool 2 minutes on cookie sheet.

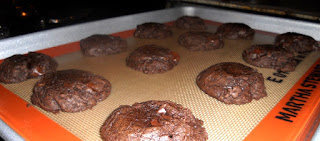
Fresh out of the oven...mmmm...they smell good!

Let cool completely before dressing them up! I LOVE this baking twine.


Enjoy!